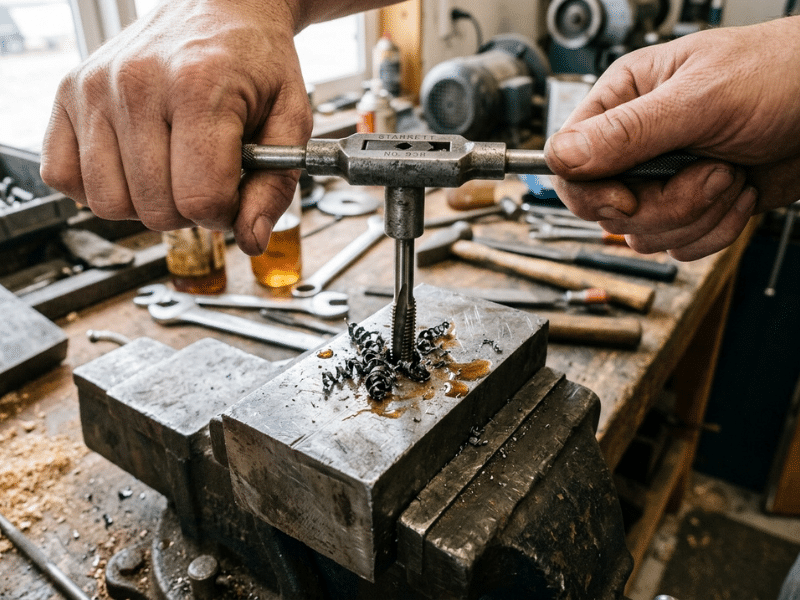
Most beginners don’t snap a tap because they turn it the wrong way. They snap it because they drilled a hole the wrong size.
I see the same three mistakes again and again. The pilot hole runs too small. The tap starts at a slight angle. Chips pack into the flutes until the tap locks up.
Each one feels minor in the moment. Together, they ruin threads and break tools.
This guide shows you how to pick the right drill size, start the tap square, and clear chips before they jam. You’ll learn what to feel for, when to stop, and how to cut clean threads on the first try.
What Hand Tapping Actually Does
Hand tapping cuts internal threads into a hole you’ve already drilled. Once those threads exist, a bolt or screw can turn straight into the part. You don’t need a nut on the back side.
The tool that does the work is the tap. Picture a hardened bolt with sharp cutting edges ground along its sides. As you turn it, those edges shave thin curls of metal from the hole wall and leave a clean spiral groove behind.
People often mix up taps and dies, so here’s the short version. A tap cuts threads inside a hole, while a die cuts threads on the outside of a rod or bolt.
A real job makes this clearer. Say you’re mounting a steel bracket to a frame and want a 1/4-20 bolt to hold it. You drill a #7 hole, run a 1/4-20 tap through it, and the bracket now acts as its own nut.
The same skill also rescues damaged parts. When a bolt hole strips in an aluminum housing, I often drill it out and tap it one size larger. Ten minutes of careful work puts the part back into service.
That’s the whole idea: the right hole, a sharp tap, and threads your fastener can grip.
Before You Start: The 4 Decisions That Matter Most
Most broken taps start with a bad choice at the bench, long before anyone turns a handle. I make four checks before I drill a single hole. Get these right, and the actual tapping becomes routine.
1. Choose the Right Thread Size
Start with the fastener, not the tap. Decide which bolt or screw will go into the hole, and let that choose the tap for you.
Then read the size correctly. Imperial threads look like 1/4-20: a 1/4-inch diameter with 20 threads per inch. Metric threads look like M6 x 1.0: a 6 mm diameter with 1.0 mm between threads.
Watch out for near-matches. A 1/4-20 bolt and an M6 bolt look almost identical, but they won’t swap. If you’re matching an existing bolt, check it with a thread pitch gauge before you buy anything.
2. Use the Correct Tap Drill Size
This decision affects your result more than the other three. The tap only cuts the threads. The hole decides how much metal the tap has to remove.
If the hole is too small, the tap cuts too much at once. It gets tight fast, chips have nowhere to go, and the tap snaps. Many beginners call this bad luck. Most of the time, the hole was simply the wrong size.
If the hole is too large, the tap barely touches the walls. You get shallow threads that feel loose and strip under load.
Tap drill charts aim for about 75% thread engagement. That gives you nearly full strength without overloading the tap. Pushing past that point adds very little holding power and a lot more turning force.
A few sizes worth knowing:
- 10-32: #21 drill
- 1/4-20: #7 drill
- M6 x 1.0: 5 mm drill
- M8 x 1.25: 6.8 mm drill
For metric threads, subtract the pitch from the diameter. That gets you very close.
3. Pick the Right Tap for the Hole Type
Before you choose a tap, ask one question: does the hole go all the way through, or does it stop inside the part?
- Taper tap: The long, gradual lead starts straight with very little effort. It’s the most forgiving choice for a first hole or for tough material.
- Plug tap: This is the everyday tap for through holes. It starts easily and cuts full threads quickly.
- Bottoming tap: Use it only in blind holes, and only after a taper or plug tap has started the threads. It has almost no lead, so it won’t start straight on its own.
For a through hole, a plug tap usually handles the whole job. For a blind hole, plan on two taps: start with a plug tap and finish with a bottoming tap.
4. Match Lubrication to the Material
Cutting fluid isn’t one-size-fits-all. The material tells you how much to use.
- Steel: Use a real tapping oil, and reapply it often. Sulfur-based fluids work especially well.
- Stainless steel: Use plenty of tapping oil. Heat and friction make stainless much harder to cut.
- Aluminum: Always lubricate. Dry aluminum sticks to the cutting edges and tears the threads. Kerosene or an aluminum-specific fluid works well.
- Cast iron: Tap it dry. The graphite in the iron lubricates the cut, and oil turns the fine chips into a gritty paste.
If you get the fluid wrong, the threads come out rough even when the hole size and tap are correct.
Tools You Actually Need
You don’t need a full machine shop to tap clean threads. You need a short list of the right tools. Most of the broken taps I’ve pulled out of customer parts came from someone skipping one of them.
Some tools protect your threads, and others protect the tap itself. A cheap tap set with a proper wrench will outperform an expensive tap turned with pliers. A sharp tap in a hole that’s 0.5 mm too small will still snap.
Here’s how I sort the essentials.
|
Tool |
Why it matters |
Can a beginner skip it? |
|---|---|---|
|
Tap |
Cuts the threads. A sharp HSS tap cuts cleanly and resists breaking. |
No. Must-have. |
|
Tap wrench |
Applies even force from both sides so the tap stays straight. |
No. Must-have. Pliers and adjustable wrenches tilt the tap and round off its square end. |
|
Correct drill bit |
Sets the hole size, which decides whether the tap cuts easily or binds. |
No. Must-have. “Close enough” is how taps break. |
|
Vise or clamps |
Holds the part still while you turn. Any shift puts side load on the tap. |
No. Must-have. |
|
Cutting fluid |
Reduces heat and friction, which helps the tap last and the threads come out smooth. |
Recommended. Skip it only on cast iron. Steel, stainless, and aluminum need it. |
|
Deburring / chamfer tool |
Removes the raised lip around the hole and gives the tap a clean start. |
Recommended. A dedicated tool is optional. A larger drill bit twisted by hand does the same job. |
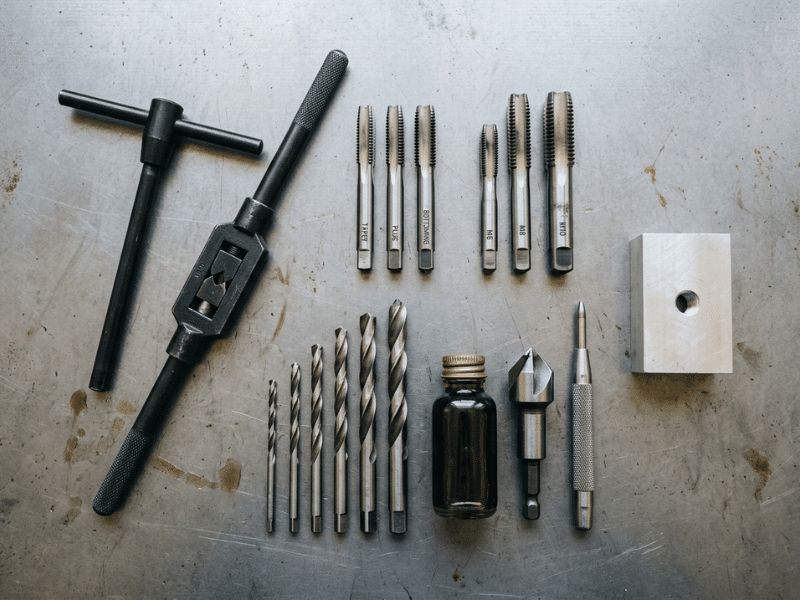
Four tools have no shortcut: the tap, the tap wrench, the correct drill bit, and a solid way to clamp the part. If you’re missing any of these, wait until you have it before you start.
Cutting fluid and a chamfer tool won’t make or break a single hole in soft aluminum. Skip them often enough, though, and you’ll see rough threads, dull taps, and crooked starts.
My advice for a first purchase is simple. Buy a decent tap set that includes the matching drill bits. Add a T-handle wrench for small taps and a bar-style wrench for anything above 1/4 inch. Pick up a small bottle of tapping oil. That kit will handle nearly every repair you’ll face in a garage or home shop.
How to Tap Threads by Hand: Step by Step
Here’s the process I follow on every hole, whether it’s a quick bracket repair or a part going back into a machine. The steps are simple. What separates clean threads from a broken tap is knowing what to watch for at each stage. I’ll point out where beginners slip up and what signs tell you to stop.
Mark and Drill the Hole
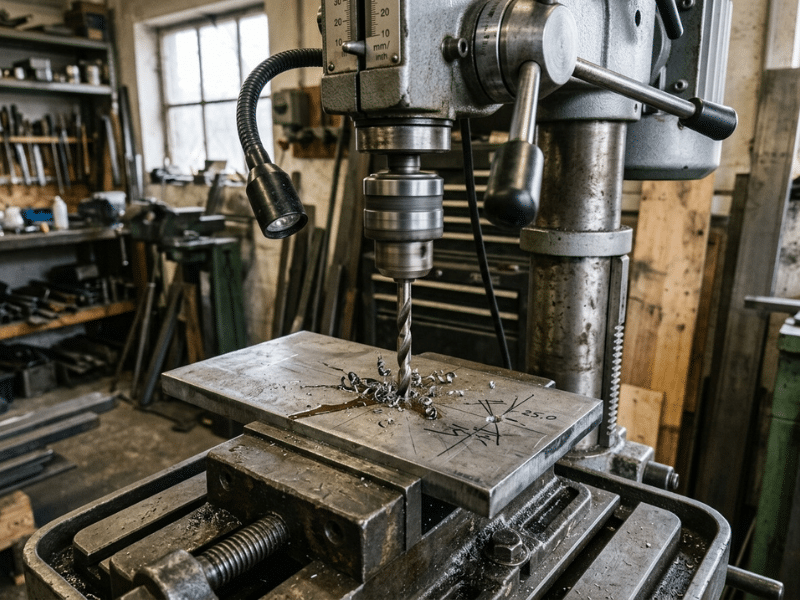
Measure your hole location and mark it with a fine-tip marker or scribe. Then set a center punch on the mark and give it one firm tap with a hammer. That small dimple gives the drill point a place to sit. Without it, the bit skates across the surface, and your hole ends up a few millimeters off.
Use a drill press if you have one. It keeps the bit square to the surface, and that matters later, because a crooked hole guarantees a crooked thread. If you’re using a hand drill, check the bit from the front and from the side before you squeeze the trigger. Glance again halfway through.
Once you’ve drilled the hole, chamfer the top edge. A countersink or a larger drill bit twisted by hand works fine. Go just slightly wider than the bolt diameter. This removes the raised burr and gives the tap a smooth funnel to start in. On through holes, deburr the exit side too.
Clamp the Work Securely
Never hold the part in your hand while you tap. Clamp it in a vise or bolt it to the bench so it can’t move at all.
Here’s why I insist on this. A tap is very hard and very brittle. It handles twisting force well, but it handles side force badly. If the part shifts even slightly while you turn, the tap takes that load sideways, and it snaps without any warning.
Use soft jaws or a scrap of aluminum if you need to protect a finished surface. Then push on the part. If it moves, clamp it again.
Start the Tap Perfectly Straight
This is the step I watch most closely when I’m teaching someone. Nearly every crooked thread I’ve seen went wrong in the first two turns.
Fit the tap snugly in the wrench. Set the tip into the chamfered hole and hold the wrench with both hands, one on each side. Press down lightly and turn clockwise. Keep your pressure even. If you push harder on one handle, you’ll tilt the tap without noticing.
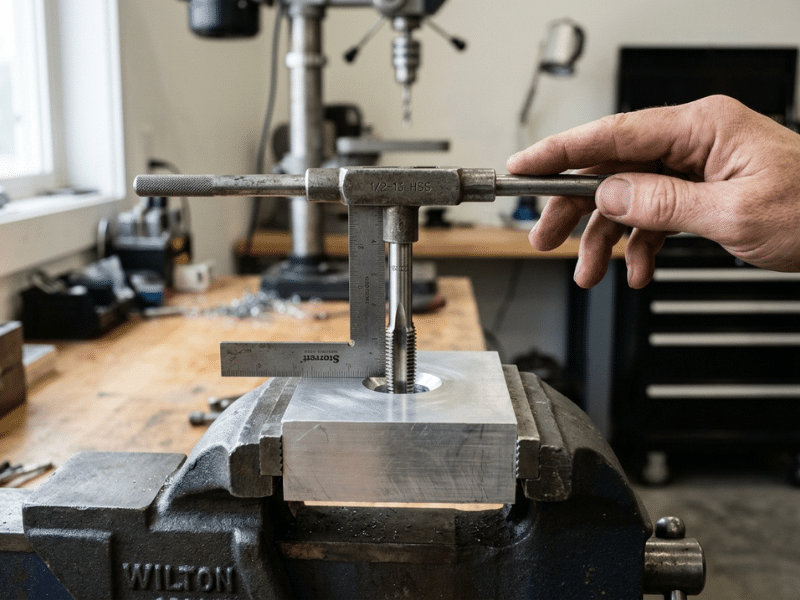
After one full turn, stop and check alignment. Look from two directions, about 90 degrees apart. One view alone can fool you, since a tap can look straight from the front while it leans toward you. For a better check, stand a small machinist’s square on the surface next to the tap shank. Any gap at the top means the tap leans.
If it leans, correct it gently on the next turn by pressing slightly toward the high side. You can only do this in the first turn or two. After about three threads, the tap has committed to its path. Forcing it straighter at that point bends the tap and breaks it. Back it out completely and start over instead.
You can also take the guesswork out entirely:
- Drill press chuck: Leave the part clamped where you drilled it. Put the tap in the chuck, power off, and turn the chuck by hand for the first few turns. Then switch to a tap wrench.
- Tap guide: A simple block with a square hole, or a spring-loaded guide, holds the tap upright as you turn.
Both methods work well. I use the drill press trick whenever the part allows it.
Cut with a Steady Forward-and-Back Rhythm
Once the tap bites, stop pushing down. The threads it cuts will pull it into the hole on their own. Your job now is to turn it and manage the chips.
The rhythm goes like this:
- Turn clockwise about half a turn.
- Back off counterclockwise about a quarter turn.
- Repeat.
When you back off, you’ll often feel a small click. That’s the chip breaking. It’s a good sign. Without that reverse motion, the tap peels one long, continuous ribbon of metal. That ribbon wraps into the flutes, packs tight, and locks the tap in place. Breaking it into short pieces gives them room to escape.
In tough material like stainless or hard steel, shorten the stroke. A quarter turn forward and a short back-off keeps the load low.
Pay close attention to what your hands feel. Resistance tells you more than anything else:
- Smooth, steady drag: The tap is cutting well. Keep going.
- Resistance that slowly builds: The flutes are filling with chips. Back out a full turn or two, add oil, and continue.
- A sudden spike: A chip has jammed, or the tap has hit the bottom of a blind hole. Stop right away.
- A springy, rubbery feel: The tap is twisting under load. This is the last warning before it breaks. Stop and back out.
- Squealing or chatter: The tap is dry or dull. Add oil, and replace the tap if the noise continues.
Beginners make one mistake here more than any other. They feel the tap tighten, assume it needs more muscle, and lean on the wrench. Don’t. Tightness means something is wrong. Force won’t fix it.
Clear Chips Before They Become a Problem
Chips cause more trouble as the hole gets deeper. In a shallow through hole, most of them fall out the bottom. In a deep hole or a blind hole, they have nowhere to go.
For blind holes, I back the tap out completely every two or three full turns of depth. Brush the chips off the flutes, blow out the hole, add fresh oil, and thread the tap back in by hand. It feels slow, but this habit saves more taps than anything else I teach.
Back out fully any time:
- Resistance keeps climbing, even with the back-off rhythm.
- You’re more than about 1.5 times the tap diameter deep.
- You’re getting close to the bottom of a blind hole.
Wear safety glasses when you use compressed air, since chips fly out fast. On steel parts, a small magnet pulls chips from the hole cleanly. Never dig them out with your fingers. Those curls are razor sharp.
Finish, Clean, and Test the Threads
Keep cutting until you reach your depth, or until the tap turns freely through the far side of a through hole. A strip of tape wrapped on the tap makes a handy depth mark for blind holes.
Back the tap out counterclockwise with steady, even turns. If it feels tight on the way out, use the same back-and-forth motion. Ripping it out can chip the fresh threads or the tap itself.
Clean the hole thoroughly with air or a brush. Leftover chips and oil will make a good thread feel bad.
Then test it with the matching bolt, turned by hand only. A good thread lets the bolt spin in smoothly to full depth with light, even drag. If it binds partway, run the tap through again or clear more chips. If it wobbles or feels sloppy, the hole was likely oversized, and the thread won’t hold much load.
Your fingers are the best gauge you have. If the bolt doesn’t feel right, trust that and find out why.
Through Holes vs. Blind Holes
The type of hole you’re tapping changes the whole job. It affects which tap you choose, how often you clear chips, and how much margin you have for error.
A through hole runs all the way through the part. It’s the forgiving one. Chips drop out the bottom as you cut, and the tap can keep going without hitting anything. If you misjudge depth, nothing bad happens. A plug tap usually finishes the job in one pass.
A blind hole stops inside the part, and that changes everything. Chips have no exit, so they pile up in the flutes and at the bottom of the hole. The tap also has a hard stop waiting for it. When it hits that floor, the cutting edges jam, and one more push on the wrench can snap the tap. Most of the broken taps I’ve extracted came out of blind holes.
|
Hole type |
Easier or harder |
Main risk |
Best tap approach |
|---|---|---|---|
|
Through hole |
Easier |
Crooked start or burr on the exit side |
Plug tap all the way through |
|
Blind hole |
Harder |
Chip packing, bottoming out, broken tap |
Plug tap first, then bottoming tap, with frequent chip clearing |
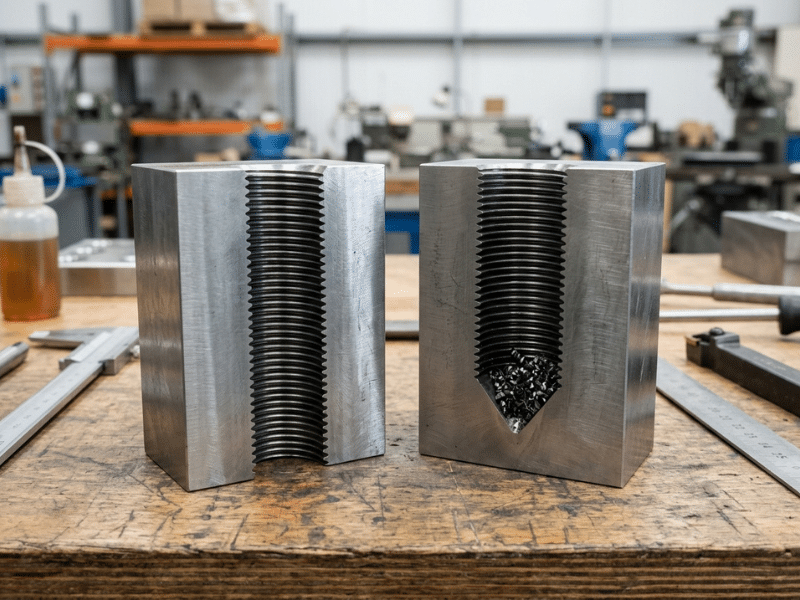
Why a Bottoming Tap Can’t Start the Hole
Beginners often grab the bottoming tap for a blind hole because the name sounds right. It’s the wrong first move.
A bottoming tap has only one or two tapered threads at the tip. Those few threads can’t guide it into the hole, so it wanders, starts crooked, and cuts too much metal at once. Let a plug tap establish straight threads first. Then the bottoming tap follows that path and simply cuts the last few full threads near the floor.
Plan the Depth Before You Drill
Blind holes go wrong at the drill, not just at the tap. If you drill only as deep as the threads you need, the tap’s tapered tip runs out of room before it cuts full threads.
Here’s how I plan it:
- Start with your full-thread depth. For example, you need 1/2 inch of usable thread for a 1/4-20 bolt.
- Add the tap’s lead. A plug tap needs about 3 to 5 threads of length, roughly 1/4 inch on a 1/4-20.
- Add a little room for chips. Another 1/16 to 1/8 inch gives them a place to collect.
- Ignore the drill point. Measure depth to the edge of the full-diameter hole, not to the tip of the cone.
That puts the 1/4-20 example near 3/4 to 7/8 inch deep. Wrap tape on the drill bit at that depth. Then wrap tape on the tap at your thread depth, so you know when to stop turning before the tap finds the bottom for you.
How Different Materials Change the Job
The steps stay the same on every hole. The material changes where the trouble shows up. A tap that glides through mild steel can seize in stainless or tear the threads in soft aluminum.
So before you start, look at what you’re cutting and think about how it will fight back. Here’s where each common material tends to cause problems, and how I adjust for it.
Steel: Steady Pace, Plenty of Oil
Mild steel is the best material to learn on. It cuts predictably, makes clean chips, and gives your hands honest feedback.
Use a real tapping oil here, ideally a sulfur-based one. Reapply it every few turns, not just once at the start. Keep a moderate, even pace. If you rush, the tap heats up, and heat dulls the cutting edges quickly.
Harder steels, like pre-hardened 4140 or old axle stock, wear taps down much faster. Shorten your strokes and clear chips more often. Here’s a simple test: run a file across the part. If the file skates instead of biting, the steel is too hard for a standard HSS tap. Stop before you ruin the tap.
Aluminum: Keep It Wet and Keep It Clean
Aluminum feels easy until it grabs. Soft aluminum sticks to the cutting edges and builds up there. This is called galling. The buildup packs the flutes, and the tap starts tearing the threads instead of cutting them.
Never tap aluminum dry. Kerosene, WD-40, or a dedicated aluminum tapping fluid all work well. Apply more than you think you need.
Back the tap out every few turns and look at the cutting edges. If you see shiny aluminum smeared on them, brush it off with a brass or wire brush before you continue. Gummy alloys like 5052 and 3003 gall more than 6061, so slow down even more with those.
Stainless Steel: Commit to Every Cut
Stainless causes more broken taps for beginners than any other common metal. The reason is work hardening.
When the tap rubs without cutting, it heats the surface and makes the metal harder right where the next cut needs to happen. Every hesitant quarter turn makes the job tougher.
Here’s how I handle it:
- Use a sharp tap. A cobalt (HSS-E) tap is worth the extra cost. Never use a dull tap on stainless.
- Apply firm, steady pressure. Make each forward turn a real cut. Don’t let the tap rub in place.
- Keep the back-off short. Back off just enough to break the chip, then cut forward again right away.
- Oil generously. Reapply after every couple of turns.
- Consider a slightly larger drill. Going up one size, about 65% thread engagement, reduces cutting load a lot and costs very little holding power.
If the tap squeals or the cut suddenly gets stiff, stop. Don’t keep turning in the same spot. You’re only hardening it further.
Brass, Cast Iron, and Plastics: Easy to Cut, Easy to Misjudge
These three cut easily, so beginners tend to relax. Each one has a catch.
Brass cuts cleanly, but it can grab. The tap sometimes pulls itself in faster than you expect, and the threads come out rough or slightly oversized. Keep control of the wrench and feed it at your own pace. A light oil helps, or you can cut it dry.
Cast iron cuts dry. Its graphite content lubricates the cut for you. It makes fine, powdery chips instead of curls, and the edges of the threads can crumble. Chamfer the hole well before you start. Clean the chips out with a brush or vacuum, because that dust is abrasive and you don’t want it in your eyes.
Plastics strip easily. Soft plastics like nylon and HDPE tend to close up around the cut, and the threads tear out under load. Turn slowly, use light pressure, and avoid heat buildup. A thread-forming tap often holds better here because it presses the threads into shape instead of cutting them away. For parts that you’ll take apart often, use a threaded insert. It will outlast any thread you cut directly into plastic.
Common Hand Tapping Problems and How to Fix Them
Even careful work goes wrong sometimes. When it does, the tap almost always warns you first, and the warning points straight to the cause. Here’s how I read those signals and what I do next.
The Tap Feels Too Tight
A tap should turn with steady drag. If it fights you from the first few turns, check the hole before you blame the tap.
Measure the drill bit with calipers. Bits get mixed up in sets all the time, and a #7 bit in the #8 slot makes a real difference. A hole that’s even 0.2 mm too small can double the cutting load.
If tightness builds slowly as you go deeper, chips are the problem. If it starts tight in fresh, oiled steel, the hole size is the problem.
Here’s my fix. Back the tap out completely. Confirm the drill size against your chart, and redrill the hole with the correct bit. The bit will clean out the partial threads, and you can start the tap fresh. This takes two minutes. Breaking a tap can cost you the whole part.
The Tap Starts Crooked
You’ll usually see this one before you feel it. The wrench handles sit lower on one side, or the tap leans when you sight it from the side.
Timing decides what you can do. In the first turn or two, you can gently steer the tap back toward upright. After about three threads, the tap has locked into its path. If you push it straight at that point, you’ll put a bend in a brittle tool, and it will snap.
So back it out. If the thread is only slightly off, restart with a tap guide or the drill press chuck method. Often the new start will follow a straighter line and clean up the first threads.
If the angle is obvious, accept it. Drill the hole out and tap the next size up, or install a threaded insert. A crooked thread will pull the bolt off-axis forever.
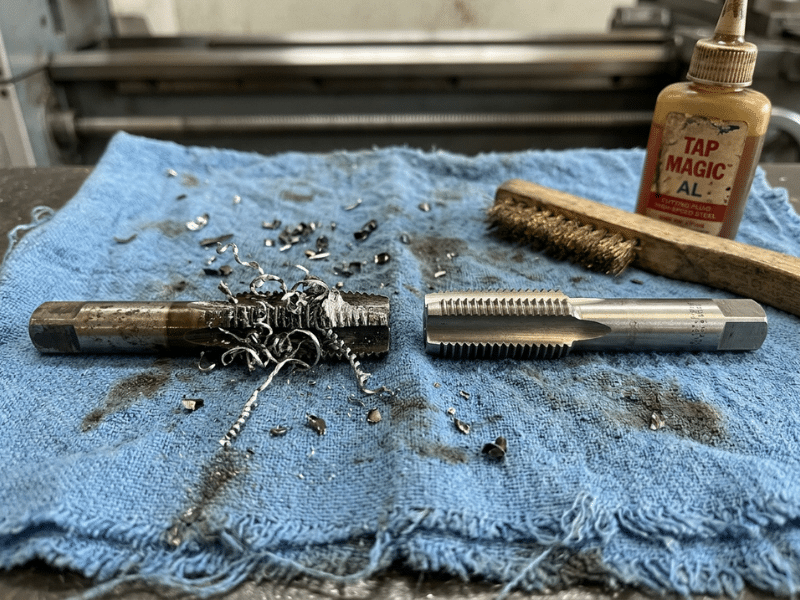
Chips Keep Packing in the Flutes
This feels like slow, creeping resistance, even when the hole size is right. Check the chips when you back out. Long, stringy curls mean you aren’t breaking them.
Make your back-off stroke a real reverse turn, not a small wiggle. You should feel that small click each time. In gummy materials like aluminum and soft steel, back out fully every two or three turns and brush the flutes clean.
If you tap a lot of holes, the tap design can solve this for you:
- Spiral point (gun) taps push chips ahead and out the bottom. Use them for through holes.
- Spiral flute taps lift chips up and out of the hole. Use them for blind holes.
Either one cuts down on packing a lot compared to a standard straight-flute tap.
The Threads Feel Rough or Oversized
Thread-in your bolt by hand and pay attention. Gritty, uneven drag points to a rough thread. A bolt that wobbles side to side points to an oversized one. Each problem has different causes.
Rough threads usually come from a dull tap, too little oil, or chips torn back across the threads. Galled aluminum causes this often. Clean the hole, oil it well, and chase it with a sharp tap. That often smooths the thread right out.
Oversized threads come from a hole that’s too big, a wrench that rocked during the cut, or a tap that wandered. Brass can cause this too when the tap pulls itself in faster than it cuts.
You can’t put metal back into a loose thread. For light loads, a slightly loose thread may still hold. For anything that carries real load, install a helical coil insert like a Heli-Coil, or drill and tap one size larger.
The Tap Breaks in the Hole
First, stop. Don’t hammer on the stub, and don’t grab the nearest drill bit. A standard bit will skate off hardened tap steel and make things worse.
Then look at what you have.
If the broken end sticks out, soak it with penetrating oil and let it sit. Grip the stub with locking pliers and work it counterclockwise with small, gentle back-and-forth movements. Patience works better than force here.
If it broke flush or below the surface, try a tap extractor on taps 1/4 inch and larger. Its steel fingers slide into the flutes and let you turn the broken piece out.
On small taps, I sometimes use a sharp punch to shatter the tap into pieces, since HSS is brittle. Then I pick the fragments out. Wear safety glasses for this.
In aluminum parts, a hot alum solution will slowly dissolve the steel tap and leave the aluminum alone.
If the part is expensive or critical, take it to a machine shop. An EDM tap burner removes the tap without touching the threads around it. That’s often cheaper than ruining the part.
Quick Troubleshooting Reference
When something feels wrong at the bench, check this table first.
|
Problem |
Likely cause |
What to do next |
|---|---|---|
|
Tap feels too tight |
Undersized hole, packed chips, dull tap |
Back out, measure the drill bit, redrill to the correct size |
|
Tap starts crooked |
Uneven hand pressure, no guide, crooked pilot hole |
Correct it in the first turn, or back out and restart with a guide |
|
Chips pack in the flutes |
No chip-breaking back-off, gummy material, deep or blind hole |
Use a real reverse stroke, back out fully more often, try a spiral tap |
|
Threads feel rough |
Dull tap, dry cut, galling |
Clean, oil well, and chase with a sharp tap |
|
Threads feel oversized |
Oversized hole, rocking wrench, wandering tap |
Use a thread insert, or drill and tap one size larger |
|
Tap breaks in the hole |
Forcing a tight tap, side load, hitting bottom |
Stop, use penetrating oil and pliers or an extractor, or send it to a shop for EDM |
FAQs
What size drill bit do I need for a 1/4-20 tap?
Use a #7 drill bit (0.201 inch). It gives you about 75% thread engagement, which suits most steel and aluminum work.
If your set doesn’t include number drills, a 13/64-inch bit (0.203 inch) works as a close substitute. It cuts slightly easier and loses almost no strength. A 5.1 mm metric bit also works.
One exception: thread-forming taps need a larger hole because they press the threads into shape instead of cutting them. Always check the drill size printed on the tap’s package.
How far should I turn a tap before backing it off?
Start with half a turn forward and a quarter turn back. Then adjust based on what you feel.
- Tough material or a small tap: Shorten it to a quarter turn forward.
- Free-cutting brass or aluminum with a sharp tap: You can stretch it to a full turn before you back off.
- Spiral point (gun) taps: These push chips ahead of the cut, so you can turn steadily without backing off in through holes.
Count your turns as you go. Counting helps you notice when the tap needs more effort than it did a few turns earlier.
Do I need cutting fluid for hand tapping?
For steel, stainless, and aluminum, yes. Cast iron cuts best dry, and brass works with or without a light oil.
If you run out of tapping oil, motor oil or bar oil works far better than nothing. Thin sprays help on aluminum but do very little on steel.
Clean the part with a degreaser afterward if you plan to paint, weld, or powder coat it. Sulfur-based oils can ruin a finish or cause weld defects.
What tap should I use for a blind hole?
Use a plug tap first, then finish with a bottoming tap. That’s the standard two-tap approach.
You can skip the bottoming tap if you drill the hole deep enough. Then the plug tap’s tapered tip has room to run past your needed thread depth.
If you tap blind holes often, buy a spiral flute tap. It lifts chips up and out of the hole, so you clear chips less often and run a lower risk of jamming at the bottom.
Why does my tap keep breaking?
Most repeated breaks come from one of three habits:
- The wrench is too big for the tap. A long bar wrench on a #4-40 or M3 tap gives you too much leverage. You can’t feel the tap tightening until it snaps. Use a small T-handle and turn it with your fingertips.
- You’re reusing a dull tap. Taps wear out. If it squeals or needs more effort than it used to, replace it.
- You’re tapping material that’s too hard. Run a file across the part first. If the file skates, a standard HSS tap won’t survive it.
If you break taps of the same size over and over, measure your drill bits. A mislabeled bit can cause the same failure every time.
Can I tap threads by hand without a drill press?
Yes. Most field repairs happen with a hand drill and a tap wrench.
The challenge is keeping things square without a machine to help. These tricks work well:
- Use a drill guide. An inexpensive drill guide block keeps the bit upright while you drill.
- Use a tap guide. A guide block with sized holes keeps the tap vertical during the first few turns.
- Make your own guide. Drill a hole the size of the tap’s shank through a thick block of hardwood or scrap steel. Clamp it over your hole and run the tap through it.
Check alignment from two sides before every drill and tap. With a guide and a careful start, you can match drill-press accuracy on most jobs.
Final Thoughts
Hand tapping isn’t about strength. It’s about control.
Three things decide almost every result. Drill the right size pilot hole. Start the tap straight. Clear the chips before they pack. Get those right, and the threads take care of themselves.
When something feels off, stop. A tight tap or a sudden spike in resistance is a warning. Back out, find the cause, and fix it before you keep going.
Before you touch a real part, grab some scrap. Mild steel or aluminum works well. Drill and tap five or six holes in a few sizes. Pay attention to how the tap feels when it cuts cleanly and how it feels when it starts to bind.
That feel is the real skill. Once your hands learn it, you’ll tap clean, strong threads with confidence, and you won’t have to guess.