


Countersinking is a fundamental process in metalworking that involves creating a conical hole to allow the head of a screw or bolt to sit flush with or below the surface of the material. This technique is crucial for enhancing both the aesthetics and functionality of metal components, ensuring a smooth, professional finish. Beyond its visual appeal, countersinking plays a vital role in improving safety by eliminating protruding fasteners that could cause injuries or interfere with machinery. Its applications span various industries, from aerospace to automotive, where precision and reliability are paramount.
Understanding Countersink Holes
What is a Countersink?

A countersink is a conical-shaped hole that is drilled or machined into a material, typically metal, to allow the head of a screw, bolt, or rivet to sit flush with or below the surface. This process involves using a specialized tool, known as a countersink bit, which creates the angled recess. The primary purpose of a countersink is to ensure that fasteners do not protrude from the surface, providing a smooth and seamless finish. This not only enhances the appearance of the material but also contributes to its functionality by reducing the risk of interference with other components or machinery.
Countersinking is a versatile technique that can be applied to various materials, including metals, plastics, and wood, but it is particularly significant in metalworking due to the precision and durability required in such applications. The angle of the countersink is typically standardized, with 82° and 90° being the most common, depending on the type of fastener being used.
Benefits of Countersinking Holes in Metal
Countersinking offers several advantages that go beyond its basic functionality, making it an essential process in metalworking.
- Aesthetic Improvement: One of the most noticeable benefits of countersinking is the clean, polished appearance it provides. By allowing fasteners to sit flush with the surface, countersinking eliminates unsightly protrusions, creating a sleek and professional look. This is particularly important in industries where visual appeal is a priority, such as automotive and consumer electronics.
- Enhanced Safety: Protruding fasteners can pose safety hazards, especially in environments where people frequently come into contact with machinery or surfaces. Countersinking eliminates these risks by ensuring that screws and bolts are recessed, reducing the likelihood of injuries caused by sharp edges or snagging.
- Secure Fastening: Countersinking also improves the functionality of fasteners by ensuring a more secure and stable fit. When a fastener sits flush within a countersunk hole, it distributes the load more evenly, reducing the risk of loosening over time. This is particularly critical in high-stress applications, such as aerospace and construction, where reliability is non-negotiable.
Applications of Countersink Holes
Countersink holes are widely used across various industries, each leveraging the technique to meet specific functional and aesthetic requirements.
- Automotive Industry: In automotive manufacturing, countersinking is used to ensure that fasteners do not interfere with the aerodynamic design of vehicles. It also contributes to the overall aesthetic by providing a smooth, seamless finish on visible surfaces.
- Aerospace Sector: The aerospace industry relies heavily on countersinking to maintain the structural integrity and aerodynamic efficiency of aircraft. By allowing fasteners to sit flush with the surface, countersinking minimizes drag and ensures that components remain securely fastened under extreme conditions.
- Construction and Architecture: In construction, countersinking is used to improve the safety and durability of structures. For example, countersunk screws are commonly used in flooring and paneling to prevent tripping hazards and ensure a clean, professional appearance.
- Electronics and Consumer Goods: Countersinking is also prevalent in the production of electronics and consumer goods, where precision and aesthetics are crucial. It ensures that fasteners do not disrupt the sleek design of products like smartphones, laptops, and home appliances.
By understanding the definition, benefits, and applications of countersink holes, it becomes clear why this technique is indispensable in modern metalworking and beyond.
Choosing the Right Countersink
Types of Countersinks

Selecting the appropriate countersink tool is essential for achieving precise results in metalworking. Countersinks are available in various materials, each designed to handle specific tasks and materials effectively.
- High-Speed Steel (HSS): HSS countersinks are a popular choice due to their durability and versatility. They are suitable for general-purpose applications and can handle a wide range of materials, including soft metals, plastics, and wood. While they are cost-effective, they may wear out faster when used on harder metals.
- Carbide Countersinks: Known for their exceptional hardness and heat resistance, carbide countersinks are ideal for heavy-duty applications. They are particularly effective when working with tough materials like stainless steel or titanium. However, their higher cost makes them more suitable for specialized tasks rather than everyday use.
- Cobalt Drill Bits: Cobalt countersinks are a middle ground between HSS and carbide. They are designed to withstand high temperatures and are excellent for drilling into hard metals. Their durability and affordability make them a reliable option for professionals who frequently work with challenging materials.
Choosing the Right Countersink Drill Bit
When selecting a countersink drill bit, several factors must be considered to ensure optimal performance and precision.
- Material Compatibility: The material of the countersink bit should match the material being worked on. For instance, HSS bits are suitable for softer metals, while carbide or cobalt bits are better for harder materials. Using the wrong type of bit can lead to premature wear or damage to the tool.
- Screw Head Size: The size of the screw or bolt head determines the diameter of the countersink hole. It is crucial to choose a drill bit that matches the dimensions of the fastener to ensure a flush fit. Oversized or undersized holes can compromise the appearance and functionality of the finished product.
- Drill Speed and Feed Rate: The performance of a countersink bit also depends on the speed and feed rate of the drill. High-speed drilling can cause excessive heat buildup, leading to tool wear or material damage. Adjusting the speed and feed rate based on the material and bit type is essential for achieving clean, precise results.
Countersink Angle Considerations
The angle of the countersink is another critical factor that influences its effectiveness and suitability for specific applications.
- 82° Angle: This is the most common angle used in the United States and is compatible with most flathead screws. It is widely used in general-purpose applications, including woodworking, metalworking, and construction.
- 90° Angle: The 90° countersink is a universal standard in many countries and is often used for metric screws. It is also suitable for applications where a wider angle is required, such as in aerospace and automotive industries.
- 120° Angle: This angle is less common but is used for specialized applications, such as countersinking rivets or fasteners in high-stress environments. It provides a broader surface area for load distribution, making it ideal for heavy-duty tasks.
By understanding the different types of countersinks, selecting the appropriate drill bit, and considering the correct angle, professionals can ensure that their countersinking process is both efficient and precise. These factors not only enhance the quality of the finished product but also contribute to the longevity and reliability of the fasteners used.
Preparing to Make a Countersink
Drilling a Pilot Hole
Creating a pilot hole is a crucial first step in the countersinking process, as it ensures precision and prevents errors during drilling. A pilot hole acts as a guide for the countersink bit, helping to maintain alignment and avoid wandering, especially when working with hard metals. The size of the pilot hole is equally important—it should be slightly smaller than the diameter of the screw or bolt being used. This allows the fastener to grip the material securely while leaving enough room for the countersink to create a clean, recessed area.
To choose the right pilot bit size, consider the material’s hardness and the fastener’s dimensions. For softer metals, a smaller pilot hole may suffice, while harder materials may require a slightly larger hole to reduce resistance and prevent cracking. Using a drill press for this step can further enhance accuracy, as it provides better control over depth and alignment compared to handheld drills.
Tools Needed for Countersinking
Having the right tools on hand is essential for achieving a smooth and professional countersink. Below is a list of the key tools required for the process:
- Drill Press or Hand Drill: A drill press is ideal for precision work, as it allows for consistent depth and alignment. However, a handheld drill can also be used for smaller or less critical projects.
- Countersink Bit: This specialized bit is designed to create the conical recess needed for flush fasteners. Choose a bit that matches the angle and size of the screw or bolt head.
- Lubricant: Applying a cutting lubricant reduces friction and heat buildup, prolonging the life of the countersink bit and ensuring a cleaner cut.
- Clamps: Securing the workpiece with clamps prevents movement during drilling, reducing the risk of errors or accidents.
- Deburring Tool: After countersinking, a deburring tool can be used to remove sharp edges or burrs, leaving a smooth and polished finish.
By assembling these tools before starting, you can streamline the countersinking process and minimize interruptions.
Safety Precautions When Working with Metal
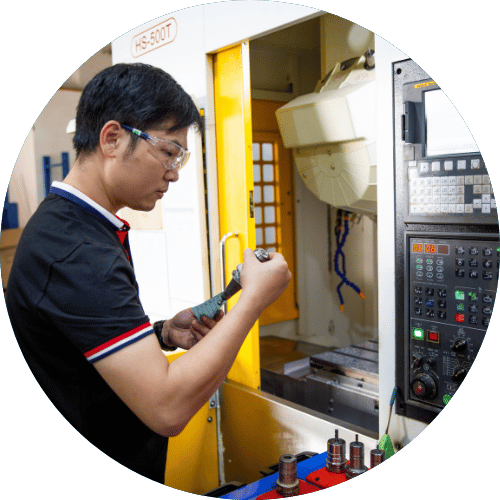
Safety should always be a top priority when performing any metalworking task, including countersinking. Following proper safety protocols not only protects you from potential injuries but also ensures a more efficient and error-free process.
- Personal Protective Equipment (PPE): Always wear safety goggles to shield your eyes from metal shavings and gloves to protect your hands from sharp edges. A dust mask may also be necessary if the process generates fine particles.
- Securing the Workpiece: Use clamps or a vise to hold the material firmly in place. This prevents the workpiece from shifting during drilling, which could lead to misalignment or accidents.
- Maintaining a Clean Workspace: A clutter-free workspace reduces the risk of tripping or knocking over tools. Regularly clear away metal shavings and debris to maintain visibility and prevent contamination of the workpiece.
- Tool Maintenance: Inspect your drill and countersink bits for wear or damage before starting. Dull or damaged tools can cause uneven cuts and increase the risk of accidents.
By adhering to these safety measures, you can create countersinks with confidence, knowing that both the quality of your work and your well-being are safeguarded.
Making a Countersink Hole in Metal

Steps to Countersink a Hole in Metal
Creating a precise countersink hole in metal requires careful preparation and execution. Follow these steps to ensure a clean and professional result:
- Drill the Pilot Hole
Begin by drilling a pilot hole that matches the diameter of the screw or bolt’s shaft. This hole serves as a guide for the countersink bit and ensures proper alignment. Use a drill press for better control, especially when working with harder metals, or a handheld drill for smaller projects. - Check the Countersink Angle
Verify the angle of the countersink required for your fastener. Common angles include 82°, 90°, and 120°, depending on the type of screw or bolt being used. Ensuring the correct angle is critical for achieving a flush fit and avoiding gaps or misalignment. - Select and Secure the Countersink Bit
Choose a countersink bit that matches the angle and size of the fastener head. Secure the bit firmly in the drill chuck to prevent wobbling during operation. A loose bit can lead to uneven cuts and damage to the material. - Adjust the Drill to the Correct Depth
Set the drill to the desired depth to avoid over-drilling. Many drills come with depth stops or guides that allow you to control how deep the countersink will go. This step is crucial for maintaining consistency across multiple holes. - Drill the Countersink Hole
Position the countersink bit over the pilot hole and begin drilling at a steady speed. Apply consistent pressure to ensure a smooth cut, but avoid pressing too hard, as this can cause the bit to overheat or damage the material. Use cutting oil to reduce friction and extend the life of the bit. - Inspect the Final Hole
Once the countersink is complete, inspect the hole to ensure it is clean and free of burrs. The fastener head should sit flush with or slightly below the surface. If necessary, use a deburring tool to remove any sharp edges or imperfections.
Common Mistakes to Avoid
Even experienced professionals can encounter issues when countersinking metal. Here are some common mistakes to watch out for:
- Over-Drilling: Drilling too deep can weaken the material and compromise the fastener’s hold. Always use a depth guide to maintain control.
- Incorrect Angle or Bit Size: Using the wrong angle or bit size can result in a poor fit, leading to gaps or protruding fasteners. Double-check your measurements and tool selection before starting.
- Failing to Secure the Workpiece: A loose workpiece can shift during drilling, causing misalignment or uneven cuts. Always use clamps or a vise to hold the material firmly in place.
Tips for Achieving the Right Countersink
To ensure a flawless countersink, consider these practical tips:
- Use Cutting Oil: Applying cutting oil reduces friction and heat buildup, resulting in cleaner cuts and longer tool life.
- Employ Depth Guides: Depth stops or guides help maintain consistent depth across multiple holes, ensuring uniformity in your work.
- Apply Consistent Pressure: Steady, even pressure prevents the bit from overheating or creating uneven cuts. Avoid forcing the drill, as this can damage both the tool and the material.
By following these steps, avoiding common pitfalls, and applying these tips, you can create precise and professional countersink holes in metal, ensuring both functionality and aesthetic appeal.
Finishing Touches
Inspecting Your Countersink Hole
After completing the countersinking process, it’s essential to inspect the hole to ensure it meets the required specifications. The primary goal is to verify that the screw or bolt head sits flush with or slightly below the surface of the material. Begin by placing the fastener into the hole and checking its alignment. If the head protrudes, the countersink may not be deep enough, requiring additional drilling. Conversely, if the fastener sinks too far below the surface, the hole may have been over-drilled, which could weaken the material or compromise the fastener’s hold.
To ensure accuracy, use a straightedge or flat tool to check the surface level. This simple step can help identify any inconsistencies. Additionally, inspect the edges of the hole for any roughness or burrs that could interfere with the fastener’s fit or the material’s appearance.
Cleaning Up After Countersinking
Once the countersink hole has been inspected, the next step is to clean up the work area and the material itself. Metalworking often produces sharp edges and small shavings that can pose safety risks or affect the quality of the finished product.
- Deburring: Use a deburring tool to smooth out the edges of the countersink hole. This not only improves the appearance but also ensures that the fastener fits securely without catching on rough surfaces. A clean edge is particularly important in applications where aesthetics and precision are critical, such as in automotive or aerospace projects.
- Removing Metal Shavings: Metal shavings can accumulate during the drilling and countersinking process. Use a brush or vacuum to clear away debris from the workpiece and surrounding area. This step is crucial for maintaining a safe and organized workspace, as leftover shavings can cause injuries or damage tools.
By taking the time to clean and deburr the material, you can achieve a polished, professional finish that enhances both the functionality and appearance of the countersink hole.
Using Countersink Holes for Screws
The final step in the process is to ensure that the countersink hole is functional and properly accommodates the screw or bolt. A well-made countersink hole should allow the fastener to sit flush with the surface, providing a seamless and secure fit.
When inserting the screw, ensure that it aligns perfectly with the hole to avoid cross-threading or misalignment. Tighten the fastener gradually, checking periodically to confirm that it remains level with the material’s surface. If the screw does not sit correctly, recheck the hole’s depth and angle to identify any issues.
Properly executed countersink holes not only improve the appearance of the finished product but also enhance its structural integrity. By ensuring that the fastener is securely seated, you can prevent loosening over time and reduce the risk of damage to the material. This attention to detail is especially important in high-stress applications, where reliability and precision are paramount.
By following these finishing steps, you can ensure that your countersink holes are clean, functional, and visually appealing, ready to meet the demands of any project.
Frequently Asked Questions
Q: What is a countersink hole?
A: A countersink hole is a conical recess drilled into a material, typically metal, to allow the head of a screw, bolt, or rivet to sit flush with or below the surface. This process improves the material’s appearance, functionality, and safety by eliminating protruding fasteners.
Q: How do I choose the right countersink bit?
A: To select the correct countersink bit, consider the material you’re working with and the angle of the fastener head. For softer metals, high-speed steel (HSS) bits are sufficient, while harder materials may require carbide or cobalt bits. Ensure the bit matches the fastener’s angle (e.g., 82°, 90°) for a proper fit.
Q: What is the purpose of using cutting oil when countersinking?
A: Cutting oil reduces friction and heat during the countersinking process, which helps prevent tool wear and material damage. It also ensures smoother cuts and extends the lifespan of the countersink bit, especially when working with hard metals.
Q: How do I ensure the correct depth of the countersink?
A: Use a depth guide or stop collar on your drill to control how deep the countersink bit goes. Alternatively, mark the desired depth on the bit with tape as a visual reference. Regularly check the depth by placing the fastener in the hole to ensure it sits flush with the surface.
Q: Can I use a hand drill to make a countersink hole?
A: Yes, a hand drill can be used for countersinking, but it requires steady hands and careful alignment to achieve precision. For more accurate results, especially in metalworking, a drill press is recommended as it provides better control over depth and angle.
Q: What are the common countersink angles?
A: The most common countersink angles are 82°, 90°, and 120°. The 82° angle is standard for most flathead screws in the U.S., while 90° is widely used for metric screws. The 120° angle is typically reserved for specialized applications, such as rivets in high-stress environments.
Q: How do I create a precise countersink?
A: To achieve precision, start by drilling a pilot hole to guide the countersink bit. Use a drill press for better control, apply cutting oil to reduce friction, and maintain consistent pressure while drilling. Regularly inspect the hole to ensure the fastener will sit flush with the surface.
Q: What should I do if I used the wrong countersink angle?
A: If the wrong angle was used, the fastener may not sit flush or secure properly. To fix this, you can re-drill the hole with the correct countersink bit, ensuring it matches the fastener’s angle. If the material is damaged, consider using a larger fastener or patching the hole before re-drilling.
Conclusion
Countersinking is an essential technique in metalworking that enhances aesthetics, ensures safety, and improves the functionality of fasteners by creating a smooth, flush surface. By understanding the process and applying best practices—such as selecting the right tools, maintaining precision, and prioritizing safety—readers can achieve professional results and elevate the quality of their projects.